| RTMM FACTS COLLECTION FOR FS2020 | |
As we "learn" the new FS2020 system and processes, all of us will have questions. We are lucky that SOME of us have answers. When we encounter those jewels of information, we will post them here in alphabetical order. You can use CTRL-F to search for subjects. |
|
| RTMM/FS2020 FACTS | |||||
FS2020 Flightplanning Non-Airport Arrival Point |
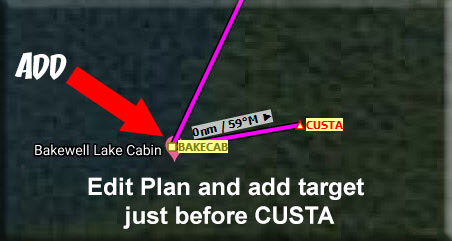
NOTAM: This procedure works fine the FIRST time you use it. FS2020 has a RESET you can click on if you want to choose a second destination. Unfortunately, at the moment, the RESET does not work. If you choose a second flight plan, it will remember the destination of the first one. This has been submitted to Zendesk 06.01.2021. From Rod Jackson: The flight planning software typically does not allow you to complete a flight plan unless the "arrival airport" is actually an airport. These programs do not recognize a custome WayPoint like a cabin as a legitimate arrival. There is a "fix" and a way around this: 1. In FS2020, set up your departure airport. 2. For arrival, add the digital coordinates of the target location by copying the line of two coordinates (Lat. & Long.) from the RTMM WayPoints table, clicking on the search box on the left of the World Map and then using Ctrl v to paste that line of coordinates in the search box. At the bottom of that box a custom location of coordinates will appear. Click on this and it will put a Custom box on the world map. Then click on the custom box and click the "Set As Arrival" option. A "custom arrival" will appear in the Arrival box up top showing the arrival at "-AIRBORNE- XXXXXX ft". The custom box on the world map will also be labeled "Custom Arrival". 3. Go to the bottom of the screen and choose Load/Save. Then, after selecting "Save" and entering the file name (enter the final name of the plan you want), BE SURE YOU choose "Flight plan (*.PLN)" in the "Save as type" field before clicking on the final Save button. Save the plan where you keep them for FS2020. 4. Pull up the pln in Little NavMap and edit the route putting in the WayPoints and their names. Important: Make sure you add a final waypoint for the target location right next to the CUSTA final point (see pic below). If you don't add that last waypoint at the location before CUSTA, the flight plan, when flying, will not give you the final leg from the final waypoint to CUSTA. Save this as LNMPLN and Save it as "Export to FS2020". **
5. The final leg from the final waypoint to CUSTA will not be flyable in the sim which is why you need the final waypoint before CUSTA to be right next to it. The CUSTA is there because FS2020 needs that custom arrival point (CUSTA) to properly process the flight plan. |
||||
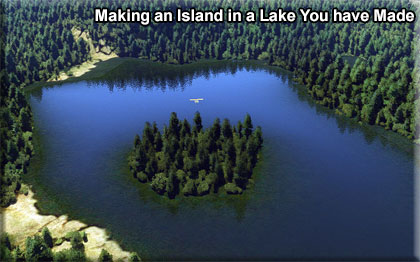
| Island In A Lake | From Doug LInn - How to make an island in a lake you have created Once you have constructed the lake. Make a polygon where the island should be. Terraform the island "up" about 3 feet and give it a fall off of about 5. Give this polygon a "priority 1". Use this polygon to make a duplicate polygon. Uncheck the Terraforming on this one and check Water and EXCLUDE (make sure you are excluding the correct water, eg Lake, Ocean, etc). Set this polygon priority at 0. You now have an island. Your island may already have vegitation. If it does not, make another duplicate polygon and check veg.
|
||||
| Lake Construction in FS2020 | From Doug Linn - How to make a lake in FS2020 The lakes in FS2020, when they are not there, are dry depressions, usually with several high banks. If you draw a polymer at the base of all these black cliffs, you will end up with good water, but with black cliffs on the shoreline in many places. If your polygon is not at the bottom edge of the black cliff, but up it a little, then water will "run up the cliff". Bottom line, very difficult and the result with the black cliffs is not good. Tip 1: before working on a lake, make a "target" triangle polygon in the center of the lake. Do not check anything ... rename it "TARGET". When you are working, when you quickly need to go to a top-down view, double click the "TARGET" polygon and you will be centered over the lake looking down. When finished with the processes below, delete this polygon. Tip 2: Make an extra large polygon around the lake and check on "VEG" and set the vegetation scale to zero (taking all vegetation out of the picture. Rename this VEG EXCLUDE. When finished with the procedures below, delete this polygon. Lake with no bank - Procedure A 1. Draw a polygon around the lake keeping it just outside the "greenery" around the lake. (maybe about what would be 10 feet onto the shore). When complete, set that polygon to Terraform ... but don't do anything to the polymer. (Leave the fall off at 200 for now). 2. Draw a second polygon inside the first and staying as close the the edge of the greenery as possible. When this is complete, select WATER and LAKE. The first polygon brings the lake level to the level of the shoreline. The second polygon puts the water at the edge of the lake where you decide it goes. You can go back to the first polygon and change the 200 to another number and select the best result for the kind ofr terrain around your lake. Notam 1: You cannot "depend" on the colors of the vegitation (looking down) to determine where the first polygon should be drawn. Best to make a polygon for the whole lake area and set it to vegetation zero. This strips away the bio and allows you to see the real edge area of the lake. Follow that outside contour for the first poly. Then delete the Vegetation polygon. Notam 2: The water will be even with the shoreline. To add some realism, terraform a few feet along the bank where the cabin is with a polygon, raise it a little. (Be sure the water does not "creep up" the bank). The shore around the rest of the lake will not matter. Delete the TARGET and VEG EXCLUDE polygons from Tip 1 and 2. Lake with bank - Procedure B 1. (See Tip 1 and 2 above) Draw a polygon at the edge of the visable lake boundary. Set it to Terraform and give it a "40" falloff. Now lower the polygon by about ".5". (If you do not like the result, uncheck the Terraform and start over lowering less or more, you do not have to redraw the polygon. 2. Duplicate the Terraformed Polygon, rename it "terra-water". Now UNcheck the Terraform box and check the WATER box. Choose "Water" or "Lake" as the surface. You should have water now showing over the surface of the Terraformed polygon. (Delete the Target and and VEG EXCLUDE polygons from Tip 1 and 2. |
||||
| LITTLE NAVMAP | From Rod Jackson - LNMPLN Save ... what is it? FS2020 flight plans have the same extension as FSX/P3D flight plans which is .pln. However, the FS2020 and P3D (three different versions) navdata information is different. So if you use a FSX\P3D flight plan in FS2020 it may work or it may crash depending on how the two sim's navdata differs. So, the exported flight plans need to be kept separate from each other. .lnmpln file is for storing the all Little NavMap (LNM) features with no data loss for any sim. It cannot be read by any sims, only be LNM. When LNM exports a .pln file for a specific sim, the file is tailored for the navdata the target sim supports. There is data loss. For someone who is using multiple sims, they should store the master flight plan as a .lnmpln file and, after they have chosen the correct sim's database under the Scenery Library dropdown and verify the flight plan shown is still correct, store the exported flight plan into a folder for that sim's flight plans. Believe it or not, for highly detailed flight plans where navdata is critical, there are four different versions of the .pln files depending on which sim is checked in the Scenery Library drop down. The four possibilities are FS2020, P3Dv3, P3Dv4 and P3Dv5. Before exporting .pln files the LNM users need to make sure the proper sim is selected in the Scenery Library dropdown. From Doug Linn - Set Coordinates format in LNM necessary for FS2020
When you right click on the Little NavMap map, go to "MORE" (at bottom), then COPY. That goes to clip board. You can go into WORLD on the flight sim, hit CTRL-V in the SEARCH box, and you can start your flight at that position. |
||||
| Latitude and Longitude For RTMM Website |
From Doug Linn - Latitude and Longitude standard for the RTMM website The FS2020 Simulator accepts the coordinates format of: "Latitude and Longitude with Sign" .... Example: 55.00125 -131.76956 When that format is copied into the SEARCH box on the WORLD sim page, clicking on it gives you a CUSTOM start point that can place you anywhere in the world. But at this time, you cannot change the altitude, heading or speed. RTMM will be using that lat/long format in describing our scenery positions, WayPoints and POI's to be fully compatible with FS2020. |
||||
| Object Library Usage for Developers | From Rod Jackson - If you are an RTMM Scenery developer, please review the RTMM 2020 Modal usage in the linked document below. This has to do with checking the quality of an existing object before placement, and also discusses creating high resolution objects. It also discusses the models available to all RTMM scenery developers. If you are working with models, please read this document. Click on the DOC button below:
|
||||
| Trail through Woods | From Doug Linn - To make a Road or a Trail through a forest Be in top down view (dev camera). Draw a polygon for the path of the trail. Keep the polygon as NARROW as you can (VERY narrow). Set this polygon to Vegitation, and the amount of vegitation to zero. Set the "falloff" at about .3. Duplicate the above polygon, turn off the veg check. Turn ON the Surface, Check Airport and for material, use RUNWAY in the materials box and select DIRT. Set the priority at "1". NOTAM: If you are going up or coming down a steep hill, the two ends may not be exactly where you want them ...the polygon drawing stays at its uppermost elevation. So adjust the ends to give the effect you desire. |
||||
| Water Airport Creation | From Doug Linn - Adding a Seaplane Base airport NOTAM: I am buiding this instruction, adding to it as I learn, do not consider it complete. 1. Make sure you have an FOLDER for you new airport in your Package Sources folder. 2. Make sure you add the Asset Group to your PACKAGE DEFINITIONS xml file ... the names must exactly match, like this (see bold): <AssetGroup Name="rtmm-KBE-bell-island-spb"> 3. Find airport lat/long from web 4. In World, add lat/long to search as "departure" 5. When you hit the "fly" button immediately hit the "y" for slew to stop it. Lower your aircrart (F1) to the water. Turn the aircraft in the direction of the runway heading. In Developer Mode...Open your project using the asset group you put in in step 2.. 6. Select VIEW/OBJECTS/AIRPORT and click Add (go to top down view) 7. Select Properties for the AIRPORT. Use Trans to move airport exactly to your airplane and hit "ADD". Right click and select Properties for the airport. 8. Add the information into the blank fields ... NOTAM, on the 2nd field for ICAO, once you enter the ICAO, you MUST click ENTER, or it will not "accept" it. 9. Next, in the OBJECT/VIEW, select RUNWAY 10. Enter Configuration information .. from top down, move the runway's center to the center of your airplane. With rotate, rotate the runway into the airplane's heading. 11. In OBJECTS/VIEW, select TAXI/PARKING and position this circle where you want your "water ramp" to be...select "DOCK". Move the circle to where you want the dock start to be and Use the ROTATE on the GIZMO to get the arrow on the circle to point in the direction you want your aircraft to start in. 12. From OBJECTS/VIEW, select TAXI POINTS. Be sure you select "NORMAL". Add a point near the runway, add another pont near the new parking circle you made. 13. Make taxi paths ... click on the Runway and then with CTRL pushed, select the taxi point nearest the runway. For Properties, click on "CREATE PATH". Now select the Taxi Point near the Runway and use CTRL enter to select the Taxi Point near the parking circle and again "create path". Now select the Taxi Point near the parking circle and with CTRL, enter select the parking circle and once again create path. No for each of the taxi paths that are created, select properties on each one and UNCHECK draw surface. 14. Click on your RUNWAY and select properties and select TRANSPARENT. 15. Save Scenery ... Be sure to go to your Project editor and click on the base package, then click on the Inspector to BUILD SCENERY. |
||||
| Water "Ghost Image" masking | From Kevin Lewis - FS2020 uses satellite BING images for their scenery. When something is in the water, it usually shows up as a white "ghost" image, maybe a boat, a pier, etc. You can get rid of these images and make the water over the image look like the water around it. Here is a short video from Kevin Lewis describing how it is done, using the "APRON" feature. |
||||
| Water Runways | From Doug Linn - adding water runways It is not clear how how water runways are made. The process is simple, but to get the direction correct on the runways, and to get that direction to show up correctly on Little NavMap and Plan-G, takes some effort. This is the process I am using: When you have your "Sea Plane Base" "open" and you are ready to add a runway... 1. Position your aircraft on the center of the marker for your airport. Using Slew, turn the aircraft in the proper direction for the runway, pick a cardinal direction, E/W/N/S/NE/SW/SE, etc. 2. Go to Designer Camera .. back away from the plane and go above it looking down at it on an angle. 3. Got to VIEW/OBJECTS/and select RUNWAY by selecting the [runway] NAME of the cardinal direction you chose in which your airplane is pointing. 4. The Runway appears. Now use TRANSLATE to move the runway to the center marker for the AIRPORT (which is now your plane). 5. Use ROTATE and rotate the runway in the exact direction of your plane. 6. Go to Runway Properties, in CONFIGURATION, make both runways WATER and WATER. 7. Under Materials, check TRANSPARENT, and add a material of WATER (at the bottom of the ASOBO materials List). 8. Choose SAVE SCENERY, then close the project in the project edotor so the BUILD PACKAGE shows in the INSPECTOR. Click on Build Package. 9. Reopen your package in Project Editor and again LOAD to VIEW. Now, rotate the runway 180 degrees exactly, re-aligning back up on your plane's direction. 10. Click on SAVE SCENERY, then close the project in the Project Editor so the BUILD PACKAGE shows up in the INSPECTOR. Click on Build Package. 11. Outside the sime, now go to your source folder, delete the PACKAGES and "_PACKAGELNT" folders. Move the project xml over to the FSpackage.exe and rebuild the package. When you next look at the sime, the runway should be in position and if you check it on LIttle NavMap or Plan-G, the layout will have the correct runway indicators. I cannot tell you why step 9 is necessary. If you don't go "out" of the process and come back in and change the runway direction by 180 degrees, your runway will be 180 degrees off. |
||||
| Windy Things | From Doug Linn - adding animated flags and windsocks "Windy Things" is a mod you can download from Flightsim.TO (LINK HERE). We are going to be using this program to put in flags and windsocks. They will not be in every scenery locations (the cabins don't need them), but for locations like the SPB's, they are needed for wind direction. If a person does not have Windy Things downloaded and installed, nothing is lost ... flags and windsocks simply will not show up. If you have it installed, then you will see them fine. We are documention where this comes from in the Readme for the New Objects Library to give the author credit for the fine work. |
||||
| FS2020 Quick Cleanup | From Norm Richards
For STEAM from Doug Linn C:\Users\yourname_\AppData\Roaming\Microsoft Flight Simulator
|
||||
|
|||||
| Back to Top | |||||